





Meet the gothic vampire lady bringing serious drama to black and grey realism. Created by Chanelle Jasmin, this piece is a masterclass in tone, texture, and contrast, built from black ink and greywash tones.
Watch the video below to see Chanelle's full process from start to finish, or keep reading for a breakdown of her technique, tips, and the supplies she relies on to bring pieces like this to life.
What Is A Black And Grey Realism Tattoo?
A black and grey realism tattoo aims to recreate a subject, whether a portrait, an animal, or an object, with photographic accuracy using only black ink and its diluted greywash tones. Rather than relying on colour to create depth and dimension, the style depends entirely on tonal range, from solid black through to the lightest grey, to achieve lifelike shading, texture, and contrast.
Chanelle's Process for Realism Tattoos, Step By Step
- Shading the face
Chanelle recommends shading in one direction first, pushing the machine away from you, and then going back over it with cross-hatching to build depth. Start light and build your tones gradually rather than committing to darker values too soon. Use a pendulum motion for larger areas and work slowly and with control to achieve smoother shading.
- Shading the lips
Lightly brush in the lip line first, keeping the top line slightly lighter than the rest to give a more natural, softer appearance. A round shader works well for building texture into the lines of the lips, and Chanelle advises that it's not worth overthinking the exact placement here, just use small variations for a natural look. As with the face, shade in a backward motion for a smoother finish, and keep your tones building slowly and gently rather than rushing to full saturation.
- Shading the nose
Begin with the nostrils, then move on to the creases, keeping your linework gentle throughout. When it comes to shading, build your tones slowly using a pendulum motion, the same way you would when shading larger areas of the face.
- Shading the eyes
Keep your liner as light as possible when working on eyelashes, using a range of thicknesses to keep them looking natural. A shader works best for shading in the eyeliner itself. Build up your linework gradually with small strokes, stopping short of the pupil, and take your time building tone rather than going straight to a heavy finish. The pupil should stay relatively light, and a mix of dark, light, extra light, and medium tones will help give the eye genuine depth and realism.
- Shading the eyebrows
Use your liner to build individual hair strokes for texture, rather than solid shading. Keep the hairs closest to the nose noticeably lighter, almost fading out like a subtle ombre effect, to help the brow look more natural.
- Shading the hair
A shader is better suited to hair strands than a liner, which tends to be too thin for the thicker and thinner lines you need to build realistic texture. Leave space for highlights using a lighter shade, but avoid pure white, since the hair itself is quite dark. Mixing darker, harsher lines with softer shading in between is what gives the hair depth.
Black And Grey Realism Essentials
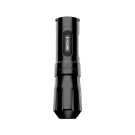
- Machine: For this piece,Chanelle used the Bishop Power Wand, 4.2mm, Packer, a well-rounded machine for lining and shading, giving you the versatility to switch between fine detail and larger areas without changing your setup.
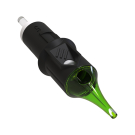
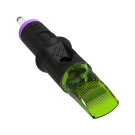
- Cartridges: Chanelle uses a mix of Peak Stellar, Kwadron and Cheyenne, a reliable range of brands that hold up across long, detailed sessions, so you can move between lining and shading without compromising on consistency.
- Inks: Dynamic and Panthera XXX are rich, consistent blacks that pack smoothly and hold their saturation as they heal, giving realism work the depth it needs to stay sharp long-term. Pair with the Whitewash Series from Empire Ink, pre-mixed for stability and consistency.
- Hygiene & Aftercare: Hustle Butter Foaming Tattoo Soap is a gentle, effective cleanser that keeps skin clear throughout long sessions without disrupting the delicate tonal work you've just built up.
Final Advice For Long-Lasting Black And Grey Realism Tattoos
Patience is everything with a piece like this. Chanelle's main advice is to build your tones slowly, and don't be afraid to give clients a break between stages. Letting the skin settle means you're always assessing calmer skin rather than guessing through swelling or trauma, so you can see exactly where more depth is genuinely needed, not just where it looks that way in the moment.
Frequently Asked Questions
Do black and grey realism tattoos last?
Yes, when done well. Longevity comes down to strong saturation, correct value contrast, and proper healing. Poor technique or inconsistent aftercare can cause fading, blurring, or loss of definition over time.
Do realism tattoos age well?
Realism tattoos can age very well when composition and saturation are considered from the beginning. Simplifying detail where needed, using solid value contrast, and following proper aftercare all help a piece hold its clarity for years rather than just looking sharp in early photos.
Is a realism tattoo expensive?
Realism tattoos range in price, depending on the artist with the cost reflecting the time, skill, and precision required to achieve accurate proportions, smooth shading, and photographic detail, often across multiple sessions for larger pieces.
How long does a black and grey realism tattoo take?
It can vary depending on the tattoo. However, larger, more detailed pieces like a full portrait or backpiece often require multiple sessions to complete. Building tones slowly, and giving the skin proper breaks in between, is what allows for the depth and precision realism work depends on.
What skills do you need to tattoo black and grey realism?
Realism relies heavily on a strong understanding of tonal value and shading control, alongside patience and a steady hand. Artists moving into this style often spend time building their confidence with value range, contrast, and blending technique before attempting large-scale, highly detailed work.
Related Guides
Inside Tom Farrow’s Black & Grey Seminar: Building Tattoos That Last
How To Create A Freehand Tattoo In Blackwork Style with Chapta
How To Create A Black And Grey Tattoo with Keith Burke
How To Tattoo Black And Grey Surrealism